click and start earn money

Propellerads

USE CODE (1RUPEE) FOR HOSTING IN RS.1

Showing posts with label BLOGGING TIPS. Show all posts

Friday, 8 September 2017

How to Create Google+ Brand Pages for your Blog

Google plus pages is a great way to give exposure to your brand on Google plus social networking site. Many of you make a mistake of treating your personal profile as your brand page, but it’s a wrong approach. You should create a dedicated Google Plus page for your brand (Blog, Website or any other).
In this guide, you will be learning to create a Google Plus page.  Before we move ahead, lets quickly create a page for our brand on Google+

When you create a page, it works like a Google+ profile, where you can share anything including images and videos. You can start a hangout, you can add people to your circles. The only difference is you can add only those people who have added you. This feature is going to be very helpful in targeting anything on your Google+ brand page. For example, if you are into services, you can add your client based on loyalty and keep offering offer based on group and so on. Ideas are limited, but this new follow back feature is going to be very beneficial for any brand. It’s good to have a plan from day one regarding the circles which you will create for your page. Anyways, let’s get start with your first Google+ page.

Step by step guide to create Google+ Brand Pages

Go to Create page and select your business type. If you are creating a Google Plus page for your Blog, you should select the brand as option.
Choose Google plus page type
Once you have selected the category, On the Next page; give the page name, add your website like and select type of page again.
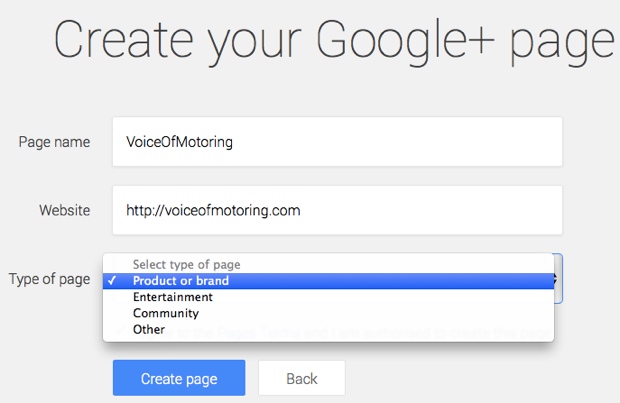
Create Google plus page
Click on Create page, and friendly Google plus for business help tour will help you to fill out all other essential information.  Click on Edit and start filling out all the information about your Website/product on your Google Plus brand page. I suggest you to provide all essential information about your brand so that one-time visitor are more likely to follow your brand page on Google+.
Edit Google plus page information
You should enter the description about your brand and upload the brand image. Here is the image dimension for your Google Plus brand cover and profile photo:
  • The maximum size of the cover image can be of 2120 x 1192 px
  • The minimum size of the cover image must be more than 480 x 270 pix
  • The size of the profile picture is still of 250 x 250 pix
Google+ team has integrated a nice image editor to enhance your Google+ profile pic. Once you are done creating Google Plus page for your brand, you should share your page on your Google plus profile and on other social-media profiles. This is the first step to start getting followers on your Google+ brand pages.
If you own multiple Pages, you can easily switch between them using this drop down on left-hand side. You can create a Google+ hangout with your fans or share your page on your wall from right-hand side.


Like Facebook fan page, Google+ brand pages also have photos and videos tab which is going to be very useful for user engagement. We will talk more about user engagement on some other post, but for now it’s time to go and grab your brand page on Google+. Soon Google is launching Google+ brand follow widget which will be more like Facebook fan page widget, where user can quickly add you to their circle.

                                                                                                                   CREDIT - SHOUTMELOUD


Sunday, 6 August 2017

How To Create A FREE Blogspot Blog [6 Easy Steps For Beginners]

Starting a blog is the BEST gift you can give yourself at any day of the year.
A blog not only allows you to express yourself, share your expertise, and make fans and followers but also helps you earn a decent income through your blog.
Image result for HOW TO CREATE A GOOGLE BLOG

How To Create Privacy Policy Page For Blogger And WordPress?

A Privacy Policy is a disclosure information about how the site gathers any information from the visitors and about the ads served.
It provides a credibility and trustworthiness to your blog. Many ad serving programs including Google AdSense looks for a privacy policy on your blog before approving you in their advertising network.
Image result for CREATE PRIVACY policy PAGE

How To Add Custom Robots.txt File in Blogger?

In one of my previous posts, I had discussed Custom Robots Header Tags Settings for blogger. If you have read that post then I hope you guys are aware of its importance in search rankings.
Today, I am back with a very useful and must aware blogging term that is Robots.txt.
In blogger it is known as Custom Robots.txt that means now you can customize this file according to your choice.
In today’s tutorial, we will discuss this term in deep and come to know about its use and benefits. I will also tell you how to add custom robots.txt file in blogger.
So let’s start the tutorial.

What is Robots.txt?

Robots.txt is a text file which contains few lines of simple code. It is saved on the website or blog’s server which instruct the web crawlers to how to index and crawl your blog in the search results. That means you can restrict any web page on your blog from web crawlers so that it can’t get indexed in search engines like your blog labels page, your demo page or any other pages that are not as important to get indexed. Always remember that search crawlers scan the robots.txt file before crawling any web page.
Each blog hosted on blogger has its default robots.txt file which is something look like this:
User-agent: Mediapartners-Google
Disallow:
User-agent: *
Disallow: /search
Allow: /
Sitemap: http://example.blogspot.com/feeds/posts/default?orderby=UPDATED

Explanation

This code is divided into three sections. Let’s first study each of them after that we will learn how to add custom robots.txt file in blogspot blogs.
    1. User-agent: Mediapartners-Google
This code is for Google Adsense robots which help them to serve better ads on your blog. Either you are using Google Adsense on your blog or not simply leave it as it is.

    1. User-agent: *
This is for all robots marked with asterisk (*). In default settings our blog’s labels links are restricted to indexed by search crawlers that means the web crawlers will not index our labels page links because of below code.

Disallow: /search
That means the links having keyword search just after the domain name will be ignored. See below example which is a link of label page named SEO.
https://www.bloggertipstricks.com/search/label/SEO
And if we remove Disallow: /search from the above code then crawlers will access our entire blog to index and crawl all of its content and web pages.
Here Allow: / refers to the Homepage that means web crawlers can crawl and index our blog’s homepage.

Disallow Particular Post

Now suppose if we want to exclude a particular post from indexing then we can add below lines in the code.
Disallow: /yyyy/mm/post-url.html

Here yyyy and mm refers to the publishing year and month of the post respectively. For example if we have published a post in year 2013 in month of March then we have to use below format.

Disallow: /2013/03/post-url.html
To make this task easy, you can simply copy the post URL and remove the blog name from the beginning.

Disallow Particular Page
If we need to disallow a particular page then we can use the same method as above. Simply copy the page URL and remove blog address from it which will something look like this:

Disallow: /p/page-url.html

    1. Sitemap: http://example.blogspot.com/feeds/posts/default?orderby=UPDATED
This code refers to the sitemap of our blog. By adding sitemap link here we are simply optimizing our blog’s crawling rate. Means whenever the web crawlers scan our robots.txt file they will find a path to our sitemap where all the links of our published posts present. Web crawlers will find it easy to crawl all of our posts. Hence, there are better chances that web crawlers crawl all of our blog posts without ignoring a single one.

Note: This sitemap will only tell the web crawlers about the recent 25 posts. If you want to increase the number of link in your sitemap then replace default sitemap with below one. It will work for first 500 recent posts.

Sitemap: http://example.blogspot.com/atom.xml?redirect=false&start-index=1&max-results=500
If you have more than 500 published posts in your blog then you can use two sitemaps like below:
Sitemap: http://example.blogspot.com/atom.xml?redirect=false&start-index=1&max-results=500
Sitemap: http://example.blogspot.com/atom.xml?redirect=false&start-index=500&max-results=1000

Adding Custom Robots.Txt to Blogger

Now the main part of this tutorial is how to add custom robots.txt in blogger. So below are steps to add it.
  1. Go to your blogger blog.
  2. Navigate to Settings >> Search Preferences ›› Crawlers and indexing ›› Custom robots.txt ›› Edit ›› Yes
  3. Now paste your robots.txt file code in the box.
  4. Click on Save Changes button.
  5. You are done!
Blogger Custom Robots.txt

How to Check Your Robots.txt File?

You can check this file on your blog by adding /robots.txt at last to your blog URL in the browser. Take a look at the below example for demo.
https://www.bloggertipstricks.com/robots.txt
Once you visit the robots.txt file URL you will see the entire code which you are using in your custom robots.txt file. See below image.
robots.txt

Final Words!

This was the today’s complete tutorial on how to add custom robots.txt file in blogger. I really try with my heart to make this tutorial as simple and informative as possible. But still if you have and doubt or query then feel free to ask me. Don’t put any code in your custom robots.txt settings without knowing about it. Simply ask to me to resolve your queries. I’ll tell you everything in detail. Thanks guys to read this tutorial. If you like it then please supports me to spread my words by sharing this post on your social media profiles. Happy Blogging!

Custom Robots Header Tags Settings For Blogger (Blogspot Blogs)

Don’t you know there are search robots? They are responsible for recognising the updates on our sites and notifying the search engines about the same.
Image result for Custom robots header tags
With the help of proper predefined tags, you can communicate with the crawlers to increase and decrease the search visibility. That’s what exactly you are going to read in this post.

How to Set up Custom Robots Header Tags on Blogger?

I hope you are a Blogger user looking forward to increasing your search engine exposure so that the organic traffic will reach a zenith.
If so, I recommend following this guide and enabling the custom robots header tags for maximum search engine visibility (especially for new blogs).
Before getting to know the process of setting up custom robots header tags on Blogger, you should know what they are.

Custom Robots Header Tags and Purpose

In Blogger, you are going to deal with the following custom robots header tags.
1. all – If you set this tag, crawlers are not bound by any constraints. They can freely crawl, index and expose your content.
2. noindex – Not all the blogs are for public notice. Even if you don’t share the URL of your personal blog with anybody, chances are people will come to it from search results. On such a scenario, you can use noindex tag as it prevents search engines from indexing the pages.
3. nofollow – Nofollow and dofollow tags are for outbound links. Dofollow is the default robot tag for all your outbound links. That means the search engines can sneak upon the pages you linked to. If you don’t want search bots to look through your links, addition of a nofollow tag must help you.
4. none – none combines the features of both noindex and nofollow tags. The crawlers will neither index your pages nor skim through the links.
5. noarchive – You might have noticed a cached label with most of the website links on SERPs. It shows that Google has captured a copy of your site into their server to display in case it goes down. That being said, the noarchive tag turns off cached version in search pages.
6. nosnippet – The text snippets in search results help people find what’s on the webpage. If you want to keep the content exclusive, you can turn this header tag on.
7. noodp – Open Directory Project or Dmoz is a man-made directory of websites. Google use the information from there sometimes. You can turn it off with this tag if you want to.
8. notranslate – Do you want to disable translation on your site? Then use notranslate for the exact purpose.
9. noimageindex – If you allow Google to index your images, people may steal it and use on their own websites. To prevent that, you can keep the images deindexed using noimageindex tag.
10. unavailable_after – In Blogger, you will get a field right to this tag. So, the webpage will be deindexed after this time.
With that being said, let’s get into the real meat of this post.

How to Setup Custom Robots Header Tags?

As you know, we are talking about setting up robots tags on blogger. Follow the steps given below to proceed with this.
Step 1: Visit blogger.com and sign in to your account. From the list of your blogs, choose the one for which you want to modify robots tags.
Step 2: Then go to Settings >> Search preference. There you can see a setting called Custom robots header tags under Crawlers and Indexing. Click the Edit link to the right of it.
Crawlers and Indexing
Step 3: At this step, you will notice two radio buttons. Obviously, the first one should be your pick.
Enable Custom Robots Header Tags
Step 4: Now, you will get a set of checkboxes. But don’t get intimidated! It may feel like a complicated one, but it’s not. You can set them on your own by reading the “Custom Robots Header Tags and Purpose” once again. Or, just follow the same settings I chose (refer to the image given below) and hit Save changes.
Custom Robots Header Tags Settings
Note: We can set this up for the homepage, archive pages, and post pages as well.
Hurray! You have done this.
Bottom Line
Trust me custom robots header tags are powerful! As Google provides a readymade setup to use them, why don’t you go for it?
And, don’t tick noindex checkbox until and unless you are sure about it because doing the same will pull your website off from search engine result pages (SERPs).
Let me know if anything bothers you regarding this topic through the comment form down below.

Translate